# Purpose of .devcontainer/devcontainer.json
The .devcontainer/devcontainer.json file is used to configure Development Containers (also known as Dev Containers) in Visual Studio Code (VS Code). A Dev Container is essentially a Docker-based environment that allows developers to create a fully isolated and reproducible development environment. This ensures consistency across different machines and allows for dependencies, tools, and configurations to be defined in code.
The devcontainer.json file defines how the development environment should be set up inside the Dev Container. This includes specifying
- the base Docker image,
- environment variables,
- dependencies,
- ports,
and any other configuration needed to replicate the development environment.
When a project has a .devcontainer/devcontainer.json file, VS Code (with the Remote - Containers extension) can automatically detect it and set up the Dev Container as defined in this configuration file.
# Key Features and Benefits of having a .devcontainer/devcontainer.json File
Consistent Development Environment: All developers working on the project will use the same development environment, including dependencies, tools, and OS setup, which helps to eliminate "works on my machine" issues.
Isolation: Since the Dev Container runs inside Docker, it isolates your development environment from your local machine. This prevents issues related to conflicting dependencies or tools on the host system.
Easy Onboarding: New developers can quickly set up a working development environment without having to install various dependencies manually. By simply opening the project in VS Code, the environment is automatically created and ready to use.
Reproducibility: By defining the development environment in code (
devcontainer.json), you ensure that it can be reproduced anywhere Docker is available, whether on a colleague's machine, in a CI/CD pipeline, or even in cloud environments.
# Example of a .devcontainer/devcontainer.json File
{
  "name": "Node.js Development Environment",
  "image": "mcr.microsoft.com/vscode/devcontainers/javascript-node:0-14",
  "postCreateCommand": "npm install",
  "settings": {
    "terminal.integrated.shell.linux": "/bin/bash"
  },
  "extensions": [
    "dbaeumer.vscode-eslint",
    "esbenp.prettier-vscode"
  ],
  "forwardPorts": [3000],
  "remoteUser": "vscode"
}
2
3
4
5
6
7
8
9
10
11
12
13
14
Explanation of Example:
name: A friendly name for the Dev Container (optional).image: Specifies the Docker image to use as the base for the Dev Container. In this case, it uses a pre-built image for Node.js development.postCreateCommand: A command to run after the container is created. Here,npm installwill install Node.js dependencies.settings: Custom VS Code settings. In this case, it sets Bash as the integrated terminal shell.extensions: VS Code extensions that should be installed in the container for enhanced functionality. Here,eslintandprettierextensions are installed automatically.forwardPorts: Specifies the ports from the container to forward to the host machine. Port 3000 is forwarded here, which is commonly used in web development.remoteUser: Defines the user inside the container. In this case, the user isvscode, a user that typically exists in Dev Containers.
# Typical Use Cases:
- Web Development: A Dev Container might be set up with Node.js, Python, or other development tools for web development projects.
- Language-Specific Environments: If you're working with Go, Rust, or Java, you can configure a Dev Container to have all the necessary compilers, libraries, and tools.
- Testing and Debugging: You can create isolated environments for testing specific versions of dependencies without affecting your main setup.
- Cloud-Based Development: When used in combination with cloud development environments (like GitHub Codespaces), the
devcontainer.jsonfile allows for a cloud-hosted version of your development environment to be instantly created.
# Prebuilding and Dev Containers
See the documentation at codespaces/prebuilding-your-codespaces (opens new window).
A prebuild assembles the main components of a codespace for a particular combination of repository, branch, and devcontainer.json configuration file.
It provides a quick way to create a new codespace. For complex and/or large repositories in particular, you can create a new codespace more quickly by using a prebuild.
To speed up codespace creation, you can configure your project to prebuild codespaces for specific branches in specific regions. You create and configure prebuilds in your repository's settings.
- Repository-level settings for GitHub Codespaces are available for all repositories owned by personal accounts.
- For repositories owned by organizations, repository-level settings for GitHub Codespaces are available for organizations on GitHub Team plans that there is the one you get from GH Education as a teacher. See About GitHub Codespaces prebuilds (opens new window).
Go to the configuration of the repo. In the section GitHub Codespaces, you can set up a prebuild configuration.
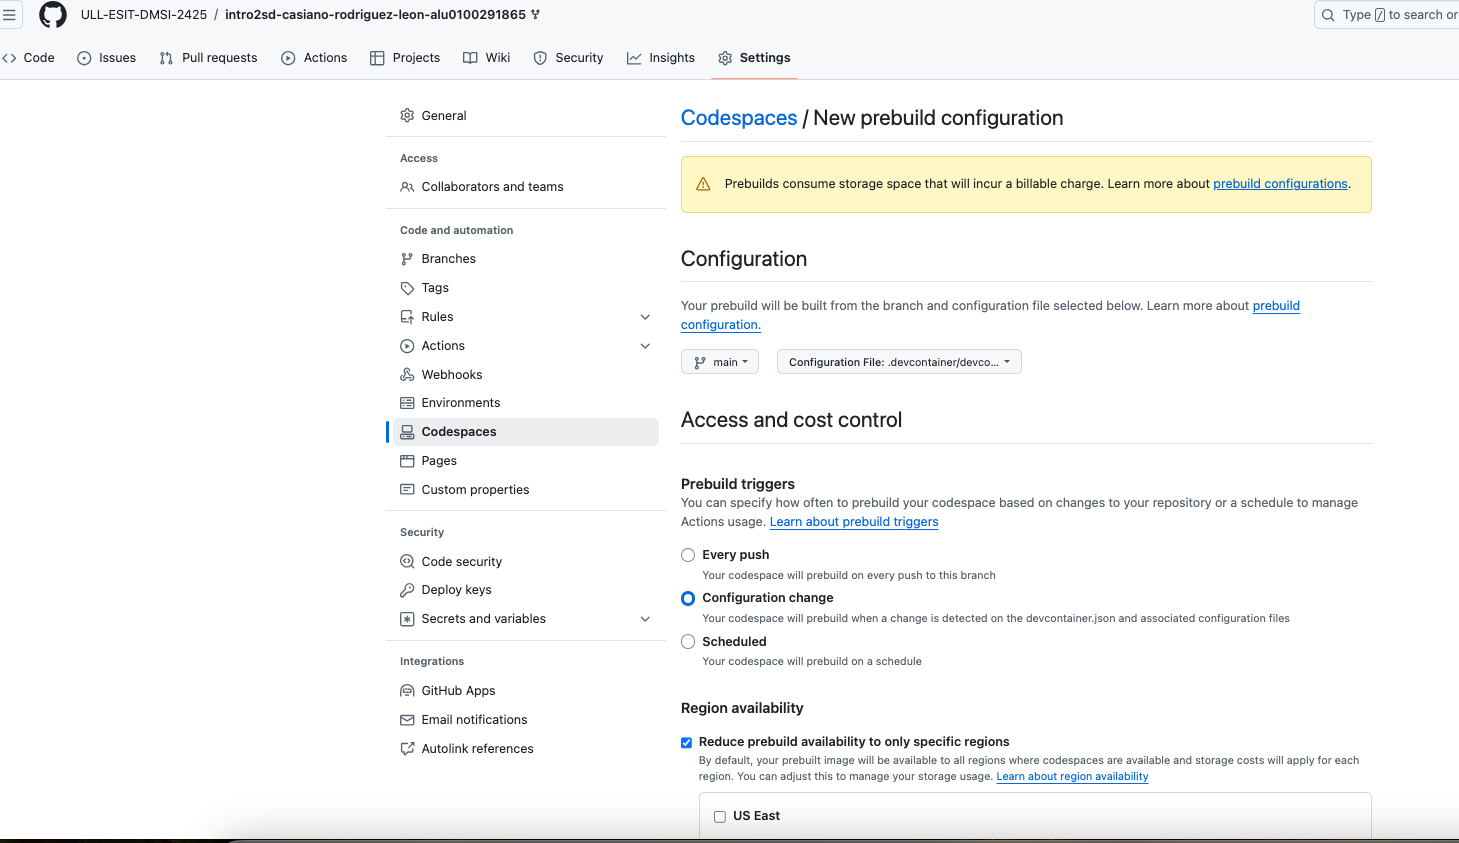
When a prebuild configuration workflow runs, GitHub creates a temporary codespace, performing setup operations up to and including
- any
onCreateCommandand updateContentCommandcommands
in the devcontainer.json (opens new window) file.
Whenever you push changes to your repository, GitHub Codespaces uses GitHub Actions to automatically update your prebuilds. As with other GitHub Actions workflows, running a prebuild configuration workflow will either consume some of the GitHub Actions minutes included with your account, if you have any, or it will incur charges for GitHub Actions minutes. Storage of codespace prebuilds is billed in the same way as storage of active or stopped codespaces.
# Example: intro2sd Dev Container for Jekyll
Repo: ULL-ESIT-DMSI-2425/intro2sd-casiano-rodriguez-leon-alu0100291865 (opens new window)
File: .devcontainer/devcontainer.json (opens new window)
{
  "postCreateCommand": "bundle install && npm install && rake serve"
}
1
2
3Output:
